If you have an email account on SBCGlobal but are tired of experiencing unpleasant situations due to encountering annoying login issues on its webmail platform and thus, want to configure SBCGlobal in Outlook— then, you’re in the right place!
“Outlook” no doubt, is one of the best and most widely used email client desktop programs that has been introduced by Microsoft. It let people configure more than one email account on its platform in order to access them without any hindrance.
In other words, the configuration of your email account in MS Outlook means, you can eliminate the lengthy process of signing into your account from a web browser. And, in fact, you can directly access the same from your desktop to exchange outgoing and incoming emails without experiencing any webmail-related error.
So, considering that you and many others like you are looking for a comprehensive guide on “configuring SBCGlobal account in Outlook” to altogether avoid its webmail issues, we’ve come out with this blog. Here you’ll get complete guidance on how you can set up your SBCGlobal email account in the MS Outlook platform including the following requirements that you need to fulfill before you start adding up your SBCGlobal email account on MS Outlook—
Prerequisites for Setting-Up SBCGlobal Email Account on MS Outlook
- Have a strong and stable network connection to avoid any interruption in the configuration process.
- Have with you all the correct details that are associated with your ‘SBCGlobal email account’ such as your username, email address, and password.
- Though optional, run your MS Outlook program in “Safe Window Mode” because doing so will disable all third-party add-ins that might interfere with the configuration process.
- And, lastly the following correct “SBCGlobal Server Settings for Outlook email client program”—
[Note: As the address of SBCGlobal servers changed to AT&T servers since when SBCGlobal merged with AT&T Communication so, the following AT&T server settings need to be used for configuring SBCGlobal in Outlook.]
SBCGlobal (Incoming Mail Server) Settings
| SBCGlobal Account Type | IMAP/ POP |
| SBCGlobal Mail Hostname for (IMAP) | imap.mail.att.net |
| SBCGlobal Mail Hostname for (POP) | inbound.att.net |
| SBCGlobal Mail Server Port for (IMAP) | 993 |
| SBCGlobal Mail Server Port for (POP) | 995 |
| Required SBCGlobal Mail IMAP TLS/SSL | YES |
| Authentication Required | YES (SBCGlobal Email account Username, Email Address, and Password) |
SBCGlobal (Outgoing Mail Server) Settings
| SBCGlobal Account Type | SMTP |
| SBCGlobal Mail SMTP Hostname for (IMAP) | smtp.mail.att.net |
| SBCGlobal Mail SMTP Hostname for (POP) | outbound.att.net |
| SBCGlobal Mail SMTP port for (IMAP & POP) | 465 |
| Required SBCGlobal Mail SMTP TLS/SSL | YES |
| Authentication Required | YES (SBCGlobal Email Account Username, Email Address, and Password) |
Now, using these server settings of SBCGlobal email, let’s execute the below given step-by-step instructions to configure your SBCGlobal email account in MS Outlook:
- Step 1: First and foremost, launch the MS Outlook email client program on your device.

- Step 2: Then, click on its “File” tab or the “Tools” section (based on what Outlook’s version you have) which is there at the top-left corner of the screen.

- Step 3: In doing so, an expanded menu will appear and from it, click on the “Add Account” option to initiate the account setup process.

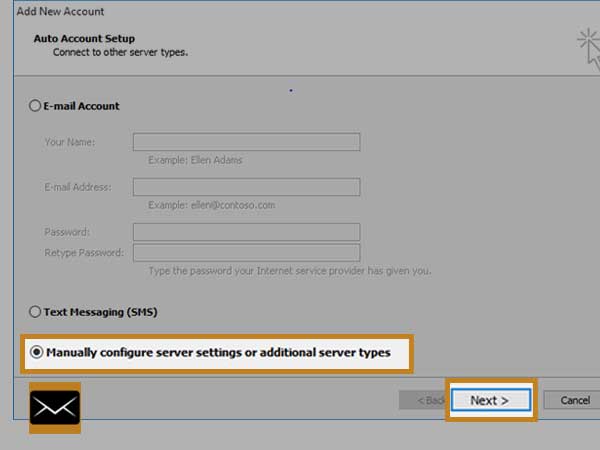
- Step 4: After that, select the “Manual Setup or Additional Server Type” option on the add account’s wizard box and at the same time, hit the “Next” button.
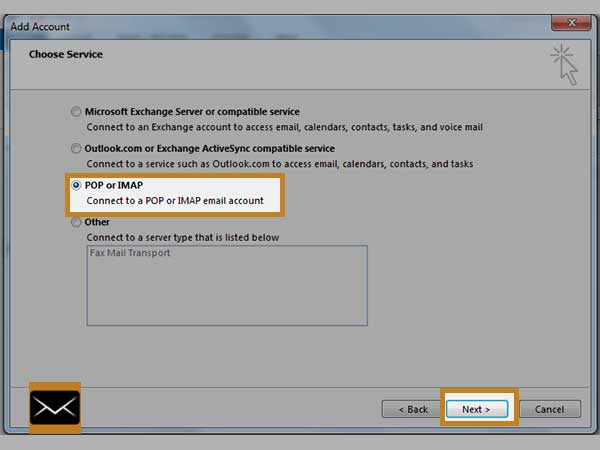
- Step 5: This will open a “Choose Service” page in front of you. There, click on the option of “POP or IMAP: Connect to a POP or IMAP email account” and again hit the “Next” button.
- Step 6: Now, you’ll be navigated onto the “POP or IMAP Account Settings” page and there, you’ve to enter the following asked details that are associated with your SBCGlobal email account:
- Firstly, in the “User Information Section” enter [Your Full Name & Your Email Address of SBC Global.]
- Secondly, in the “Server Information Section” select either “IMAP” or “POP” from the “Account Type” drop-down menu. Then, input the SBCGlobal server settings (given above) according to your selected account type for both the Incoming and Outgoing server. Basically, if you’ve selected “IMAP” then, enter [imap.mail.att.net in Incoming E-mail Server & smtp.mail.att.net in Outgoing Email Server.] Similarly, if you’ve selected “POP” then, enter [inbound.att.net in Incoming E-mail Server & outbound.att.net in Outgoing Email Server.]
- Thirdly, in the “Logon Information Section” enter the SBCGlobal.net login information i.e., [Your SBCGlobal Account’s Username & Your SBCGlobal Email Account’s Password.]
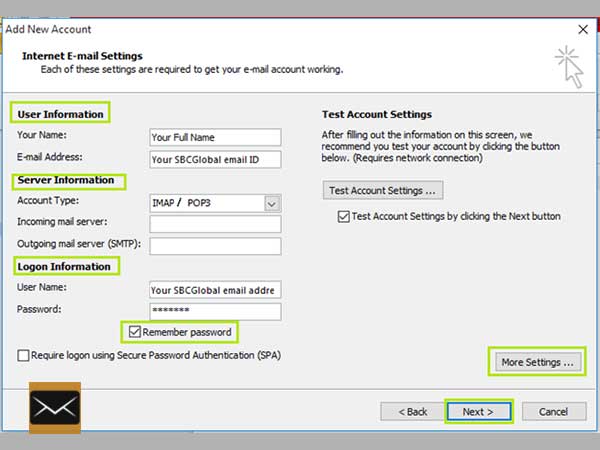
- Step 7: Once you’re done entering the required information, move ahead with the process by clicking the “More Settings” link.
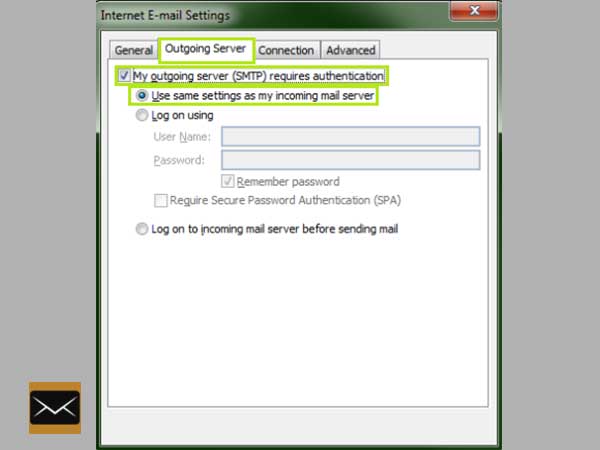
- Step 8: By doing so, you’ll reach the “Internet-Settings” page of POP or IMAP Account Settings. There, select the “Outgoing Server” tab and tick-mark the boxes of options that state—“My outgoing server (SMTP) requires authentication” & “Use the same settings as my incoming mail server.”
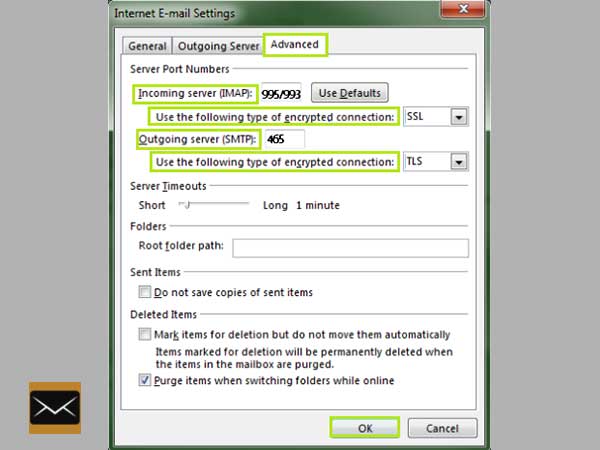
- Step 9: In continuation, direct yourself onto the “Advanced” tab, and there, input the following server port details:
- For Incoming Server (IMAP/POP), enter [993] if you’ve earlier selected “IMAP” and if selected “POP” then, enter [995].
- For Outgoing Server (SMTP), enter [465].
- Consecutively, click the “Use the following type of encrypted connection” drop-down menu to choose [SSL] as the encryption method for both “Incoming server (IMAP/POP)’ and “Outgoing server (SMTP).”
- Step 10: Now, as you finish inputting the asked details, hit the “OK” and “Next” buttons to revert to the previous page.
- Step 11: Once you reach there, choose the “Test Account Settings” option and for the last time, click the “Next” button for ensuring that you’ve configured your SBCGlobal email account correctly.
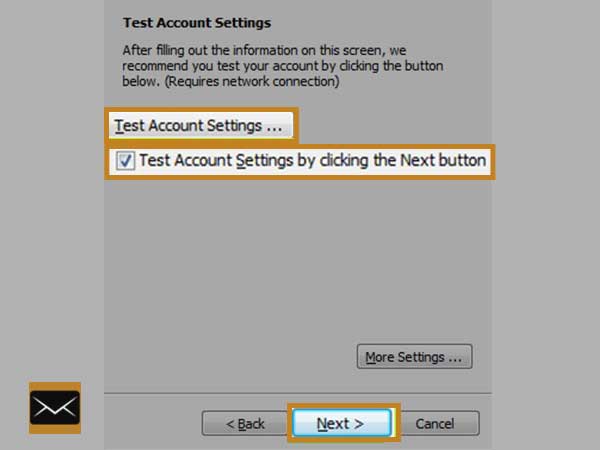
- Step 12: Well, wait for a while until you receive a message stating that— “Test is Completed Successfully” and as soon as you receive the same, it means the configuration of your SBCGlobal in Outlook has started. Thereafter, you can just click the “Finish” button to close the configuration setup process.

So, that’s it! This is the complete configuration process of setting SBCGlobal in the Outlook email client. Hopefully, now you have got a clear understanding of the procedure of how you can add your SBC Global email account in MS Outlook using SBCGlobal server settings that are in turn the settings of AT&T service only.
However, in case of any inconvenience, consider reading out this post-Sbcglobal Email is Not Working on MS Outlook? Check 2021’s Latest Troubleshooting Guide
Similarly, you can also read: A Basic Guide on How to Set up Sbcglobal Email Account on iPhone/iOS Devices