Cox Communications is an Internet service provider that offers free email accounts to those [business] users who purchase Cox’s high-speed Internet packages.
The email account that Cox offers to its users can be accessed not only through a Web browser but also using third-party email clients. In the latter case, users don’t have to use Cox.net’s webmail interface instead they check Cox emails and send messages using other email programs to simply improve the workflow.
Admittedly, most of the third-party email clients available on PCs and other devices can be used to configure Cox Business Email or you can say Cox Email to send and receive emails conveniently but, configuring your Cox email setup in the Outlook program is way more fast and easy.
[Note: Microsoft offered ‘Outlook’ is one of the best email clients on the market right now.]
So, if you’re also a Cox user and looking forward to setting up your COX email in Outlook so that you can avoid the need to log in to Cox Webmail to check your mail then, luckily you’ll have landed on the right guide.
This guide will step by step walk you through the complete process of adding your Cox account in an Outlook email client.
[Note: This may be your first time configuring your email account, so with that in mind, we’ve done our best to explain the entire ‘Cox email setup on Outlook’ process in the simplest way possible so that you encounter no (nil) difficulty during configuration of your COX email account in Outlook.]
Having said that, let’s dive straight into it—
Prerequisites to Fulfill Before You Begin
- Keep your User Information such as Cox email address and Cox password handy.
- Ensure connecting your device with a strong and stable network connection.
- Backup your Cox email account data to avoid any important data loss during or after the configuration of Cox with Outlook.
- And, most importantly, run your MS Outlook program in Safe Window Mode so that no third-party software will interfere in the configuration process.
Cox Mail Settings for Outlook 365 & Other Versions
Here are the settings you need to use with COX.net email when you decide to manually configure it on Outlook.
Cox Email IMAP Settings
(recommended as it is more advanced and flexible to sync emails across all devices.)
To access your Cox.net email account from the Outlook desktop email program using ‘IMAP Account-type’ you’ll need the IMAP and SMTP settings listed below:
| Incoming Server [IMAP] | Outgoing Server [SMTP] |
Cox Email POP Settings
To access your Cox.net email account from the Outlook desktop email program using ‘POP Account-type’ you’ll need the POP and SMTP settings listed below:
| Incoming Server [IMAP] | Outgoing Server [SMTP] |
How to Add Cox Email on Outlook?
There are two methods to set up and configure Cox email on MS Outlook email client, and you can select either of the following—
- Automatic Setup [Cox email settings configuration not required]
- Manual Setup [Cox email settings configuration required]
Cox Email Setup for Outlook
Method 1: Setup Your Cox.net Account with Your Outlook Email Program [Automatically]
- Step 1: Start Microsoft Outlook on your respective computer or any other device.
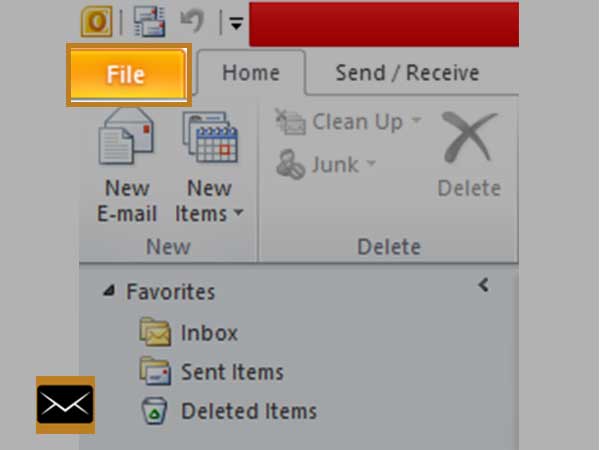
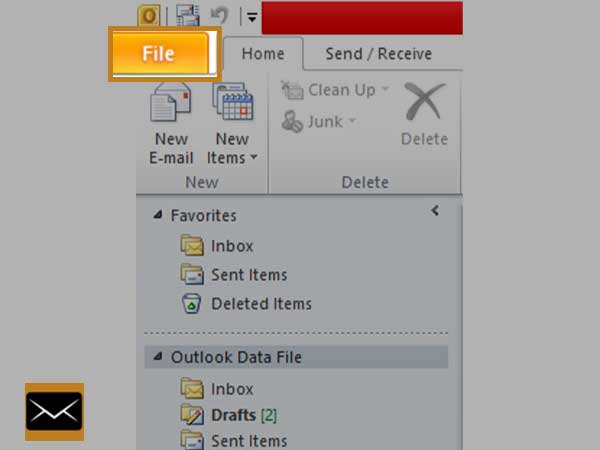
- Step 2: Then, click on the File Tab which is there in the upper-left corner of the screen.
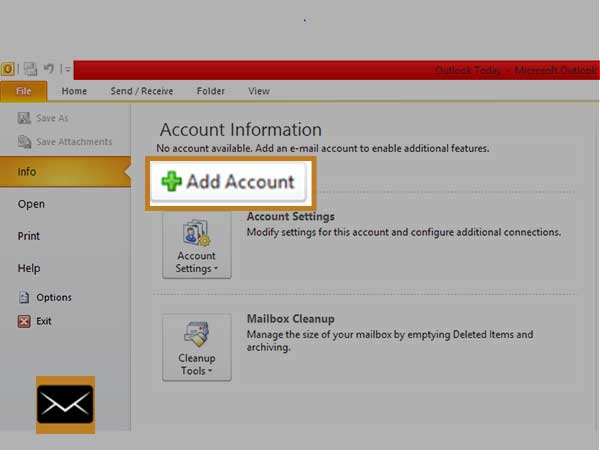
- Step 3: Next, click on the +Add Account option and in doing so an Auto Account Setup wizard box will pop up on the screen.
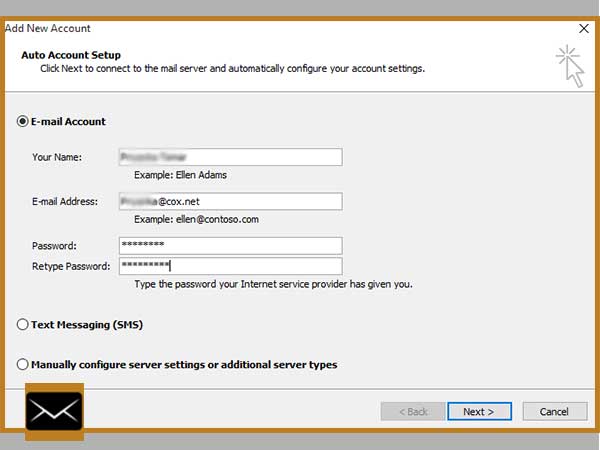
- Step 4: Inside the same, fill the following information details of your Cox mail account at the desired text-fields.
- Your Name: ________ (Enter your Full Name).
- Your Email Address: ________ (Enter your COX Email ID).
- Password: ________ (Enter your Cox Email Account Password).
- Retype Password: ______ (Re-enter your Cox Email Account Password).
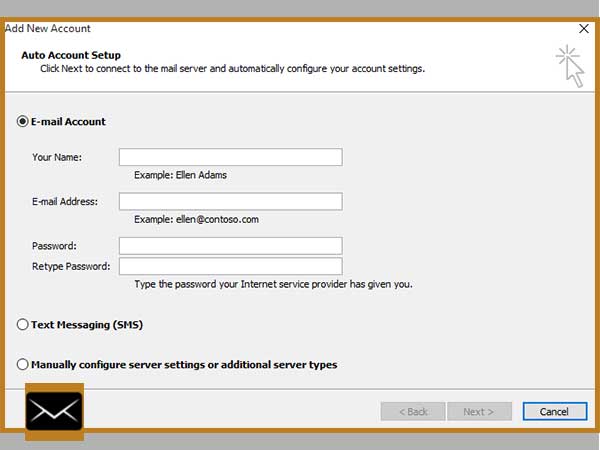
- Step 5: Now, when you’re done entering the aforementioned details, hit the Next/Connect button to connect the mail server and automatically configure your account settings.
- Step 6: In the end, select the Finish followed by Close button to complete the Auto Account Setup process of automatically adding your Cox email account in Outlook.
Method 2: Setup Your Cox.net Account with Your Outlook Email Program [Manually]
- Step 1: Open Outlook.
- Step 2: Go to its File menu and click on it.
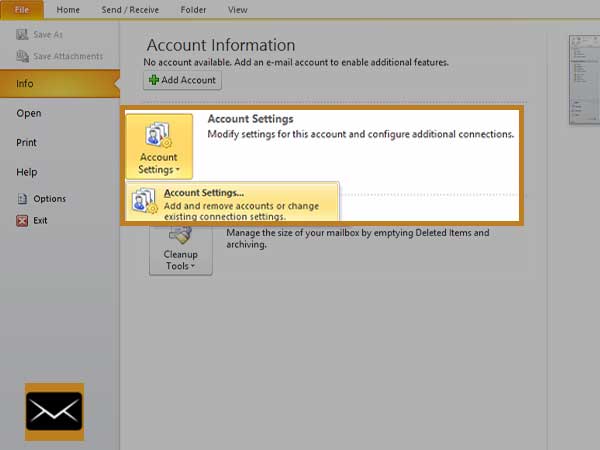
- Step 3: In doing so, a drop-down list of menu will appear and from the same, click on the Account Settings box and select the Account Setting option.
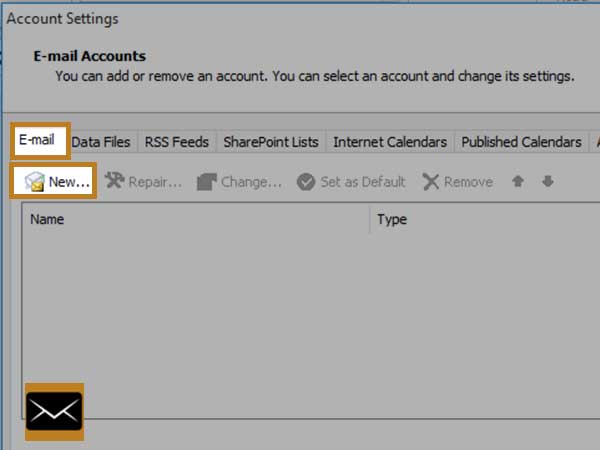
- Step 4: Then, on the account setting’s Email Tab click the ‘New’ button to launch the Add New Account wizard box.
- Step 5: Inside it, select the ‘Manual setup or additional server types’ radio button and then, simply click on Next.
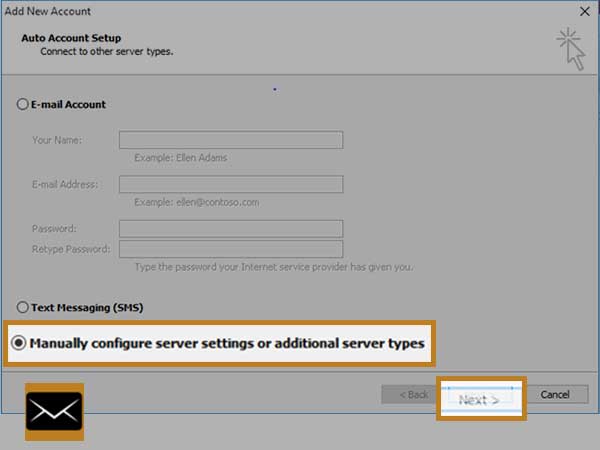
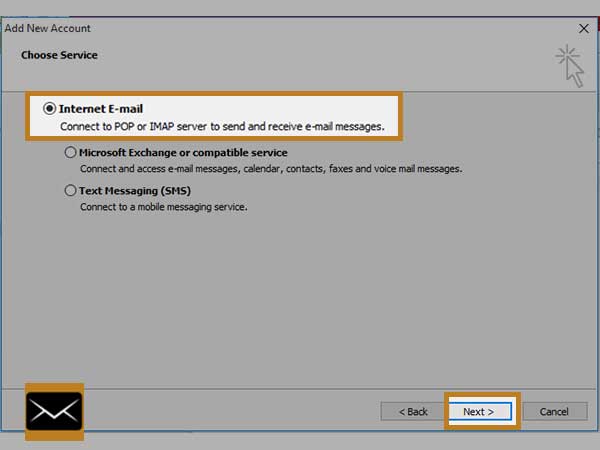
- Step 6: Now, on the Choose Service Page, click on ‘Internet E-mail– connect to POP or IMAP server to send and receive e-mail messages’ radio button and again, click on Next.
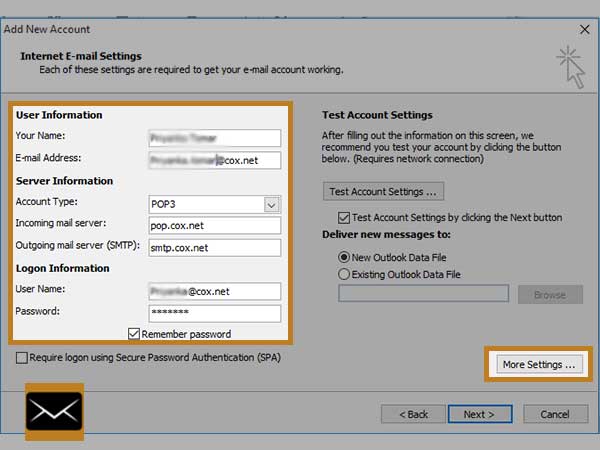
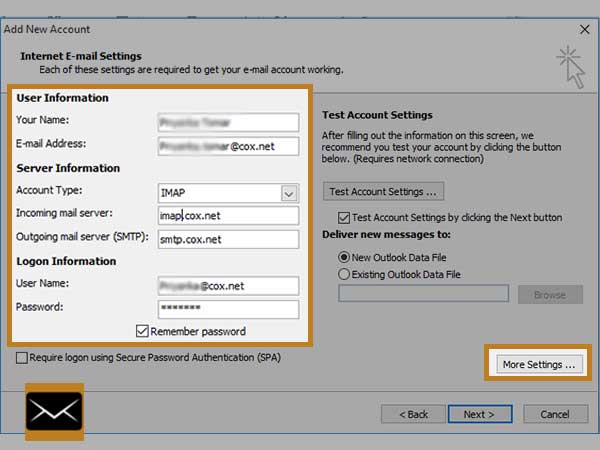
- Step 7: Now, on the Internet E-mail Settings Page, fill out the Name and full Email Address of your Cox account inside the User Information section.
- Step 8: Following that, move onto the Server Information section and click on the Type of Account option to select either ‘IMAP’ or ‘POP3’ from the drop-down list.
- Step 9: As you select the option, you need to enter the following details correctly based on your selection—
- Set the Incoming mail server to imap.cox.net (if you’ve selected IMAP) or pop.cox.net (if you’ve selected POP3) &
- Outgoing mail server (SMTP) to smtp.cox.net (for both IMAP & POP3).
- Step 10: Next, inside the Logon Information section, enter Username and Password of your Cox email account and in continuation, put a tick next to Remember password checkbox.
- Step 11: Once you’re done, click the More Settings button from the bottom-right corner of the screen to continue further with the setup process.
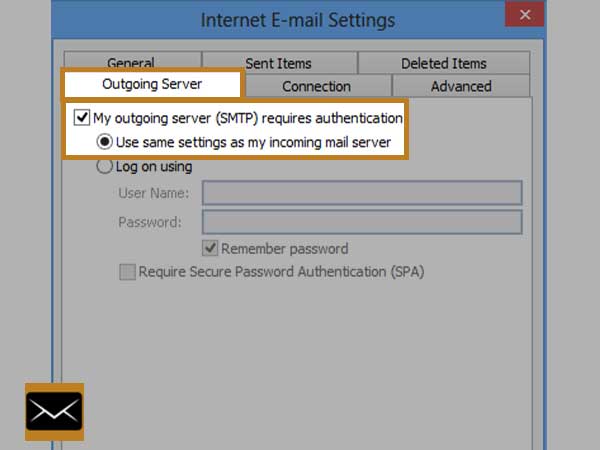
- Step 12: On this more settings page of the Internet E-mail Settings, go to the Outgoing Server Tab and check these options to enable—
- My outgoing server (SMTP) requires authentication.
- Use the same settings as my Incoming mail server.
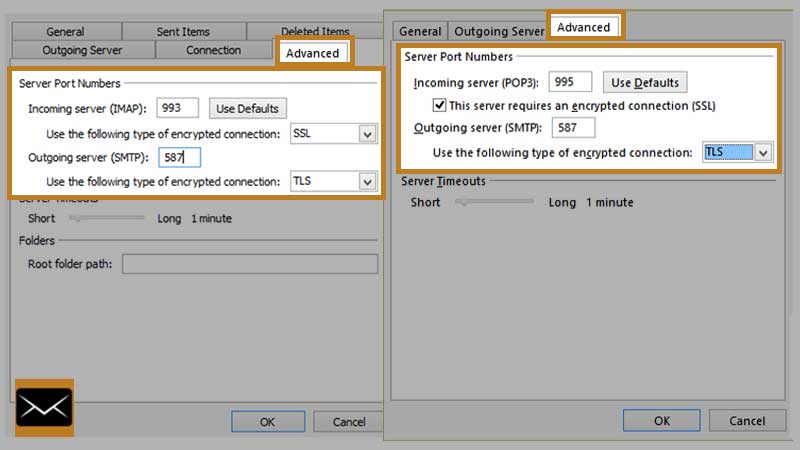
- Step 13: Following that, switch to the Advanced Tab to input the following port settings—
- Enter 993 or 143 & select SSL for Incoming Server (IMAP) or Enter 995 or 110 & select SSL encryption for Incoming Server (POP)
- Enter 465 or 587 & select SSL/TLS encryption for Outgoing Server (SMTP)
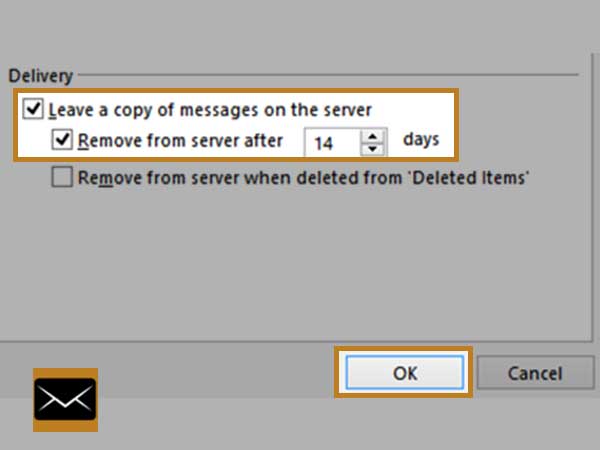
- Step 14: In continuation, tick-mark ‘Leave a copy of messages on the server’ and ‘Remove from server after 14 days’ checkboxes under Delivery section. Once done, select OK to return to the previous window.
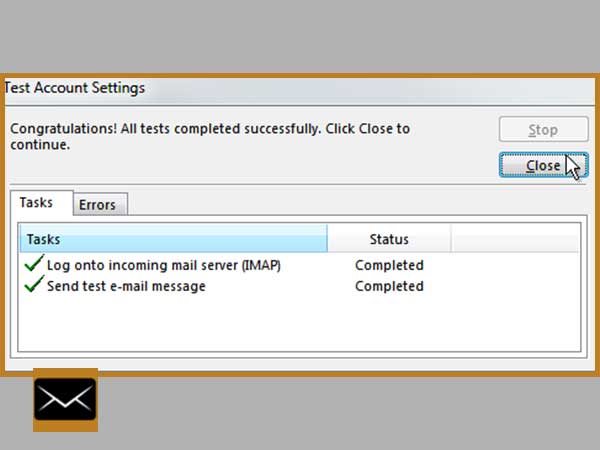
- Step 15: Now, select the Test Account Settings option followed by clicking the Next button to test account settings whether you’ve correctly synced your Cox email in Outlook.
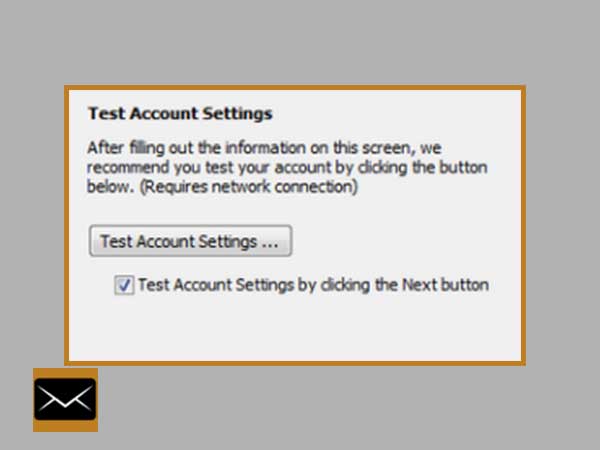
- Step 16: In doing so, if everything seems fine, and you receive this message— ‘Congratulations! All tests completed successfully’ then, simply click on the Close button to ensure your Cox account logs in properly on Outlook.
Bottom Line
That’s it! This is how easily you can configure your Cox webmail account in Microsoft Outlook using automatic or the manual method with the help of above-mentioned correct ‘Cox Email Settings for Outlook.’
And, once you are successfully able to set up your Cox email account, you can manage it from Outlook without encountering any sort of issues, especially the login ones. However, after configuration, if you encounter the ‘Cox Email not working with Outlook’ issue then, seek help from here.
Next read: Execute These Steps To Add SBCGlobal Email to MS Outlook