Email is also known as Electronic mail and is the demand of every sector nowadays whether it is Business, College, Banks, etc. With the rise in demand for email, several email service providers have come into existence e.g, Gmail, Yahoo Mail, Verizon Email, etc.
With the passage of time, electronic devices have also evolved a lot. In today’s era, the most prominent device for accessing the internet is a smartphone, and here in this article, I am going to show you how you can configure the Verizon Email on an iPhone as the accessibility of iPhone among the users is huge and is enhancing exponentially.
Before starting with the steps to set up the Verizon email on an iPhone, it is time to understand why it is needed to set up the same on an iPhone.
Benefits of Setting up Verizon Email on an iPhone
Old are the days when Verizon email used to be accessed on the desktop, it is not like the usage of it has vanished but has gone down to some extent. Also, people using a mobile device to access email have turned more towards the iPhone. It is due to the fact that there are several advantages associated with it. They are mentioned below.
1. Portability
As the name ‘Mobile Phone’ suggests that it is mobile and can be used while walking or sitting anywhere. So, the same goes for the iPhone. It can also be used to access the world wide web and email while moving or sitting at any place.
2. Easy to Send and Receive the Email
With the help of the iPhone, you can easily send or receive an email within a few taps. In addition to this, you may create the email on the go without switching on the desktop computer or logging in to the email account as you always stay synced with the email account.
3. No Need To Login Again and Again
Every time you decide to browse or create the email, you do not have to log in repeatedly as with iPhone you stay logged in all the time and the email account keeps on syncing itself.
4. You Stay Active All The Time
With the help of the iPhone, you do not have to sign in every time you wish to browse or create an email. Moreover, the sync feature of the email keeps your status live, due to it you can focus on some other productive work without having to worry about the emails at the same time.
The advantages of an iPhone are not confined only to the above ones but are numerous in numbers that you can not even think of.
Having discussed the advantages, it is time to go through the protocol settings required to configure the Verizon email on the iPhone and these have been mentioned ahead.
Verizon Email Protocols (IMAP. POP, SMTP) Settings
There are several protocols required to access the emails on the iPhone. Without these, you can not have the emails functioning properly on the iPhone. So, the protocols are IMAP, POP, SMTP. Below find the settings of all protocols one by one.
IMAP (Internet Message Access Protocol)
The main aim of this protocol is to fetch the data from the server and display it on the device screen. Settings of it with reference to Verizon email are mentioned below.
- Server– imap.aol.com
- Server Port – 993
- Encryption – SSL
POP (Post Office Protocol)
The majority of the protocol used to fetch the data from the server is IMAP but if you want to use POP, you can give it a try. The main difference between IMAP & POP is that whenever an email is deleted from the device it will also get deleted from the server in case of POP but the same is not true in the case of IMAP as in this, email persists on the server even if it has been deleted from the device.
POP settings for Verizon email are
- Server – pop.verizon.net (For Verizon Yahoo: incoming.yahoo.verizon.net)
- Port– 995
- Encryption – SSL
SMTP (Simple Mail Transfer Protocol)
This protocol is responsible for sending and receiving the email and settings of the same are depicted below.
- SMTP Server Address– smtp.verizon.net
- Secure Connection– SSL
- SMTP Username– Full email address (xxxx@verizon.net)
- SMTP Password– Your account password
- SMTP Port Number- 465 (SSL)
Are you a Verizon Yahoo user? If yes, you should use SMTP Server Address– outgoing.yahoo.verizon.net
If you want to know these settings more in detail, follow the “Verizon email server’s settings” guide. Hope it will help you to understand the protocol settings in a more clear way.
Steps To Set up Verizon Email on iPhone
Before diving into the solution, it is essential to have some prerequisites. These are mentioned below.
- Must have seamless internet connectivity
- The device should not have any virus
- The Operating System of the device should be up to date
- The device should have an optimum battery backup
- Lagging issues should not persist in the device
After having done with the above prerequisite, let us start with the steps to configure the Verizon Email on the iPhone.
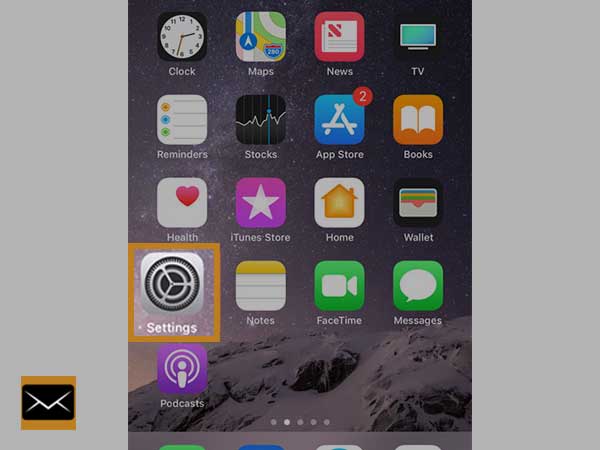
Step 1: Unlock your iPhone and double tap on the “Settings” app to open it
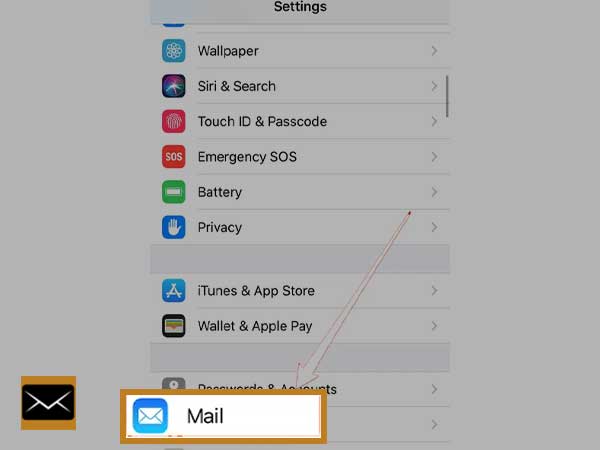
Step 2: Once the “settings” app is opened, search and tap on the ‘mail’ option
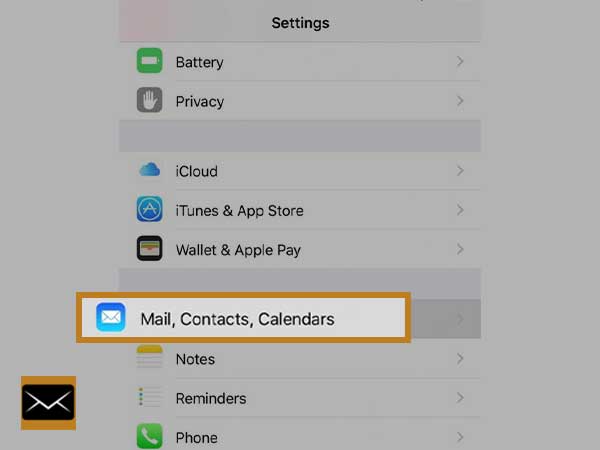
Step 3: Now a window similar to mentioned below will open up. Choose the “Mail, Contacts, Calendars” option.
Step 4: Choose “Account” and select the “Add Account” option
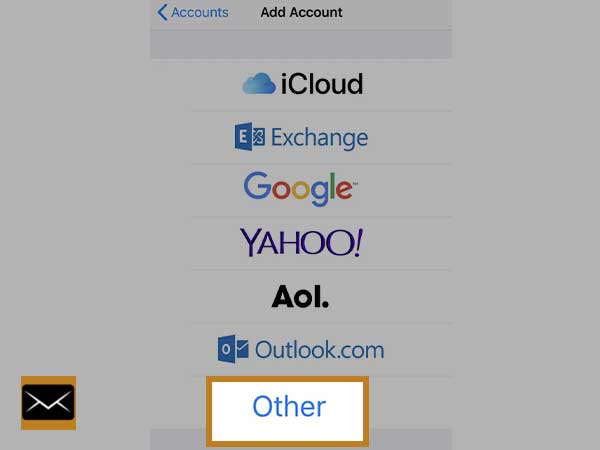
Step 5: A list of several email service providers will be shown on the screen, choose “Other” from the list
Step 6: Now a new window will open up, choose “Add Account” and provide needed information i.e,
- Name – Enter Full Name
- Email – Enter the Email address of the Verizon email account
- Password – Enter Password of Verizon email account
- Description – Enter a short description or simply the email id
Step 7: Once you are done with entering the details, choose ‘Next’ and select POP protocol as the email account type
Step 8: For “Incoming Mail Server” choose POP and enter the below-mentioned details
- Hostname- incoming.verizon.net
- Username- Enter Verizon email address
- Password- Enter Verizon email password
Step 9: For “Outgoing Mail Server” Enter the required details as mentioned below and click on the “Next” button
- Hostname– outgoing.verizon.net
- Username– Enter Verizon email address
- Password– Enter Verizon email’s password
Step 10: Check “Email” and tap on the “Save” button
Step 11: To check whether the entered details are correct or not. Choose “Advanced” and check “Incoming server” for the details
- Use SSL: On
- Identity check: Password
- Server Port: 995
If the above settings are correct, go with the next step.
Step 12: Also open up the “Outgoing Server” by tapping on outgoing.verizon.net and analyze if the details mentioned below are correct or not.
- Use SSL: on
- Identity check: password
- Server port: 465
Finally, choose “done” located at the top right corner of the screen, and restart the device.
So, these were the solutions regarding configuring the Verizon email on iPhone. If you are new to Verizon or iPhone do not panic as the solutions have been introduced after covering up the benefits and protocols settings so that newbie does not face any difficulty. If still, you are unable to resolve the issue you may contact the respective forums online and can easily resolve the issue. Hope this will surely help you to overcome the process of setting up the Verizon email on the iPhone.
Additionally, if you want to read more about Verizon Email related issues, go with this guide “Verizon Email Not Syncing on iPhone/iPad, Android, and Outlook?”