Are you discontinuing the usage of Microsoft Outlook? Or want to transfer the emails residing on Outlook to Gmail? And for this, if you are looking for the solutions, do not worry as the solutions for migrating the emails from Outlook to Gmail have been discussed ahead, but first, try syncing Outlook with Gmail to begin the migartion.
There are basically two ways of accomplishing the task, one includes configuring the Gmail email account in accordance with the Outlook email and the other solution involves the export of the “.pst” file and later importing the same in the Gmail account. Steps to achieve the same are written in a comprehensible fashion.
The major advantage of email transfer is that you will get to see all the emails in one place, without having to switch from one email account to another periodically. Also, it becomes difficult to keep the username and password of several emails in mind. So, to ease the process of browsing emails, this guide can be of great use.
Before attempting to transfer the emails, let’s understand what can be the reasons for this migration.
Reasons for Transferring Outlook Emails to Gmail
It is essential to know why users try to transfer their emails from Outlook to Gmail. Although these both are giants in the field of emails, users are favoring Gmail and not opting for Outlook for their future purposes. You will definitely get the idea for this in further points.
- The user has been using Gmail for so long and has become habitual of its GUI (Graphical User Interface) and it becomes uneasy for a user to switch to a new interface.
- Earlier users were operating multiple email accounts but with the passage of time, the burden of work has increased, and now it is difficult for the user to manage multiple email accounts.
- Security, yes it matters a lot while accessing or sending the emails. Gmail provides 2 step verification which is not available in the case of Outlook. So, if you are security-conscious and want no compromise with it, Gmail can be the best option for you.
- Outlook is known to have more learning curves than Gmail. It is because Outlook is a feature-rich application and is more than just browsing emails.
So, these were some reasons why users generally consider transferring emails from Outlook to Gmail.
Now, let’s dive into the solution.
Solutions To Import Emails From Outlook To Gmail
The process of importing Outlook emails to Gmail is not difficult and with the help of the below-depicted guide, anyone with a little bit of knowledge of Gmail and Outlook can easily accomplish the task.
But before moving the emails from Outlook to Gmail, it is recommended to transfer all required emails to the Inbox, because emails will be transferred only from the Inbox not from the spam and Draft folder.
Here, two methods will be discussed. One will include adding the Outlook email address to Gmail and another requires you to export a .pst file so that it can be imported to Gmail later.
Let’s start with the first procedure.
Method 1: Configure Gmail Account with The Outlook Email Address
This procedure requires you to have a Gmail account and an Outlook Email Address before getting started. After having these, you should follow the steps mentioned below.
- Step 1: Launch the web browser and go to the login page of Gmail and perform the login by entering the correct credentials
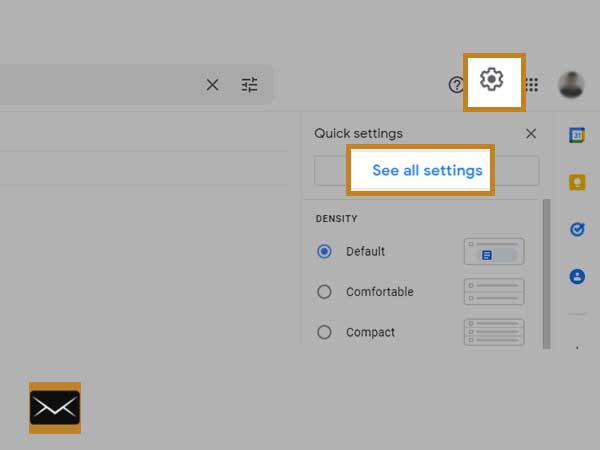
- Step 2: Once you are done with the login process, go to the gear icon (at the top right corner) and choose the “See All Settings” option. You may take the idea from the image below.
- Step 3: Now choose the “Accounts and Import” tab as shown below.
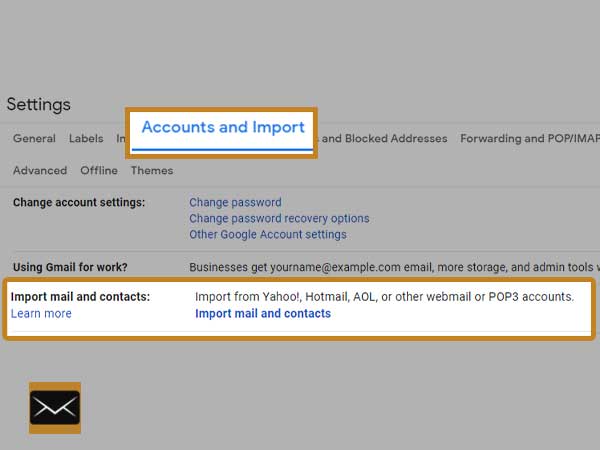
- Step 4: Now click on the “Import Mail and Contacts” under the “Import Mail and Contacts” section. Also shown in the above image.
- Step 5: Now, you will get to see a new window similar to the one depicted below. Here you are supposed to provide the email address of the account from which you want to import.
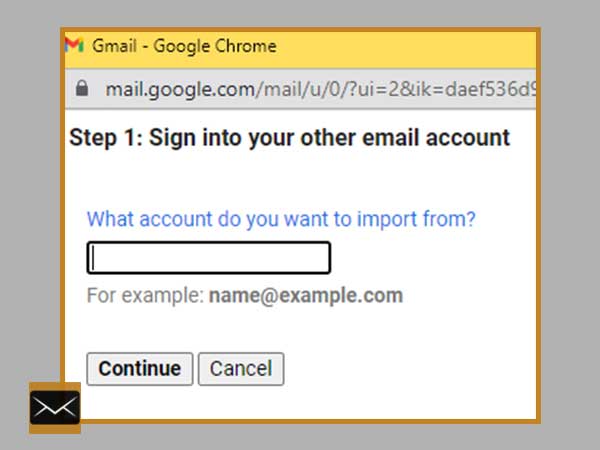
- Step 6: Choose the “Continue” button
- Step 7: A new window will open up as mentioned below and again click on the “Continue” button
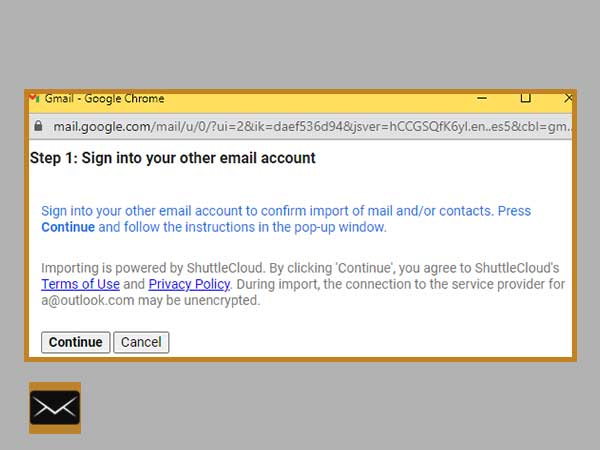
- Step 8: Now a window of Microsoft login will be opened where you are required to perform the login by providing correct credentials i.e. username and password.
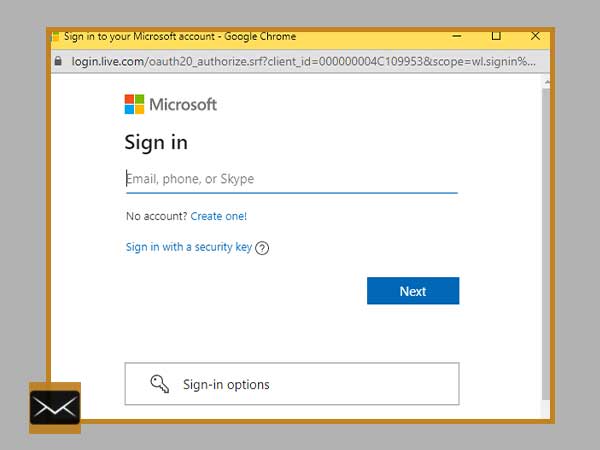
- Step 9: Once you are logged in successfully to the Outlook email, a new window asking you to give permission will be opened. After reviewing the terms and conditions, click on the “Yes” button and close the authentication window.
- Step 10: Under the import window you will be provided several options.
- Import Contacts
- Import Mail
- Import New Mails for the next 30 days
Out of all these choose the desired one and select “Start Import” and click on the OK button.
Now the import process will continue by itself without any further interaction from your side. So, now you may resume the session or may log out of the Gmail account. The import process might take a few minutes or hours depending upon how much data is required to be imported.
Method 2: Transfer Outlook Emails To Gmail Using .pst File
Before getting straight to the solution, I want to bring some points to your notice that are meant to be taken care of.
- The internet connectivity should be optimum and should not lack during the process.
- The device should be fully charged as it is not sure how much time will the import/Export take.
- There should be enough empty storage on the device so that import/Export files could be fetched without facing any obstacle.
- Importing and Exporting may slow down the PC. So, try it when you do not have any urgent task to be accomplished.
After covering up the above-told steps, now is the time to dive into the steps of exporting the Outlook emails to Gmail.
Step 1: Launch the Outlook App on your PC
Step 2: Sign in to the Outlook App using the correct credentials
Step 3: Now, export the “.pst” file and save it to the personal computer, for this follow the below steps.
- Go to the “File” option from the top menu
- Choose “Open & Export”
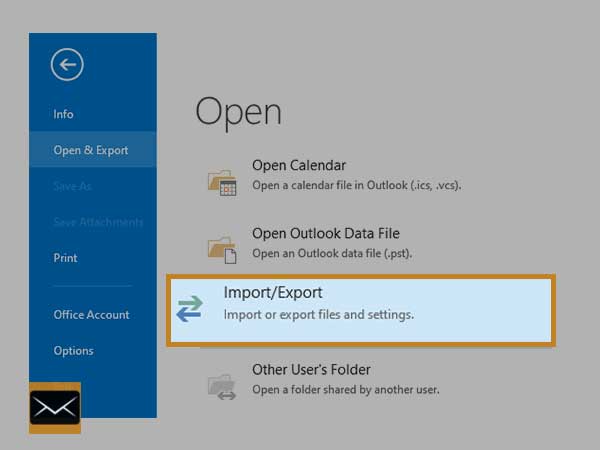
- Now, select “Import/Export”
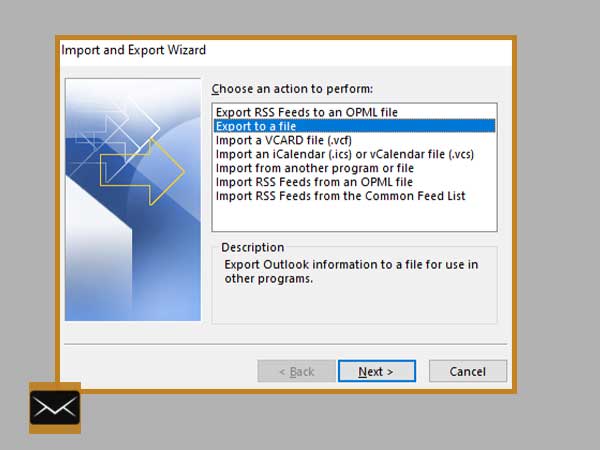
- “Import and Export Wizard” will open up, choose “Export to a file” and click on the “Next” button
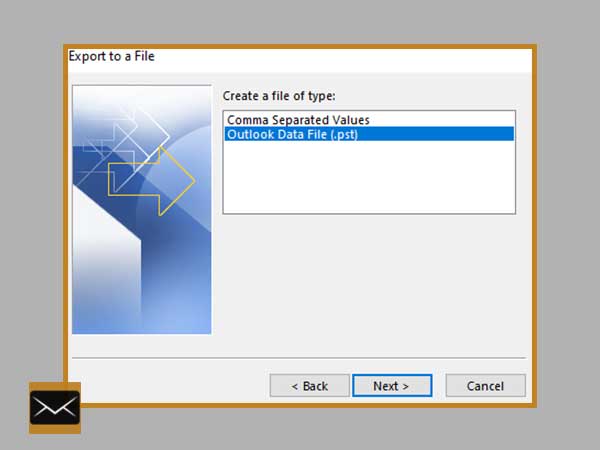
- Choose “Outlook Data File (.pst)” and select the “Next” button
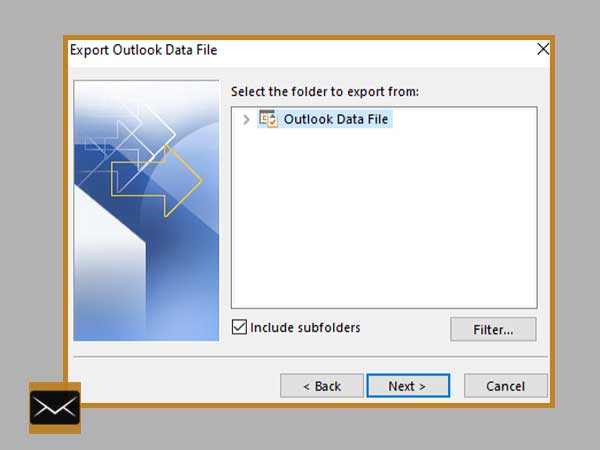
- Again click on the “Next” button
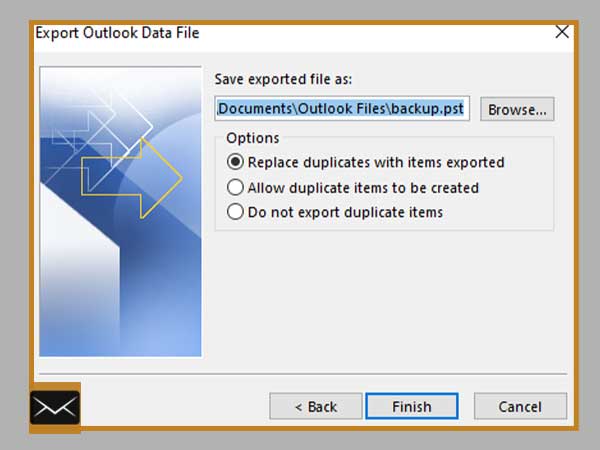
- Now click on the “Finish” button
Step 4: Now is the time to enable the IMAP, go ahead and check the steps.
- Go to the web browser and launch it by double-clicking on it
- Log in to Gmail by entering the correct credentials
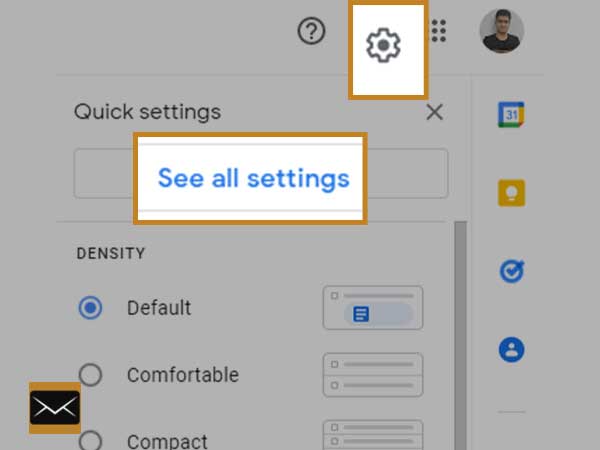
- Click on the “Gear” icon and choose “See all settings”, get the idea of it from the below image.
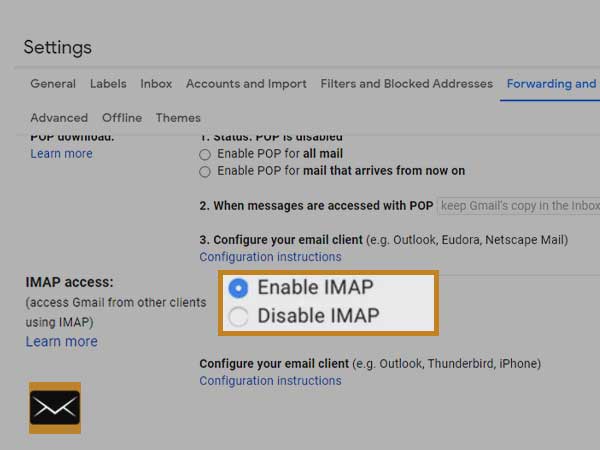
- Now, among the several tabs, choose “Forwarding and POP/IMAP” and further go to the “IMAP Access” section and click on the radio button in the front of the “Enable IMAP”. See the below image for reference.
Now scroll to the last of the webpage and click on the “Save Changes” button.
Step 5: Now, you are supposed to add the Gmail account on the Outlook app, to achieve this task follow the below path.
Launch outlook app > Go to File > Info > Add Account and follow the onscreen instructions.
Meanwhile, if the Outlook app crashes or does not function properly, it needs to be fixed.
Step 6: Now, is the time to import the previously created “.pst” file to the newly added Gmail account.
- Select the newly created Gmail account, located on the left-hand side of the Outlook app.
- Now follow the below path to import the “.pst” file
Go to File (at top menu bar) > Open & Export > Import from another program or file > Next > Outlook Data File (.pst) > Next > Click on the Browse button to locate the “.pst” file > Next
Now, wait till Outlook finishes importing the file and this process might take a few minutes or hours depending upon the size of the “.pst” file.
Step 7: Once the import is complete, you may go to Gmail on the web browser and check whether the imported emails are present in your Gmail account or not.
Till this point, all imported Outlook emails must have been transferred to the Gmail account.
This method of transferring the emails from Outlook to Gmail is quite manual and requires some prior knowledge of the Outlook app. If you do not have that much knowledge, you may take the help of any technically sound individual in your acquaintance to get the job done.
Finally, both the methods of transferring emails from Outlook to Gmail end here. You may choose either of them to get the task done. When it comes to difficulty level, method 2nd may be called somewhat suitable for those who are tech-savvy. But it does not mean that no one can attempt it, as the steps and path are mentioned in an understandable way.


