While offering easy search tools, 15 gigabytes of free storage, and plenty of other great features, no wonders why more than 1.5 billion people use Gmail at present. However, do you all know, Gmail (if not load properly) can also be configured in mobile email clients that makes it very convenient to send and receive emails anywhere anytime!
Well, knowing that Gmail like other emails can be added to email clients if you’re curious to set up Gmail in your iPhone then, this following post and the guide it contains, is all what you need for doing so!
Here, we’ve explained how you can access Gmail in your iPhone Mail app by the process of adding your email account’s server details to your phone settings. So, let’s get started—
Like any other webmail service, the server settings of Gmail are divided into three protocols i.e., IMAP, POP, and SMTP where the first two belong to the “Incoming Mail Server” and the third one is for “Outgoing Mail Server.”
After reading this, you may be wondering “What are Gmail IMAP, POP, and SMTP Settings?” So, have a look at these “Gmail IMAP/POP and SMTP Server Settings for iPhone” that you need to know well before jumping onto the instructions on “How to add Gmail to iPhone Mail?”
Gmail IMAP (Internet Message Access Protocol) Settings for iPhone
| Incoming (IMAP) Mail Server Settings of Gmail | Gmail Account Login Information |
| Incoming (IMAP) Server Host- imap.gmail.com | IMAP Username- Your full Gmail account address. Example: username@gmail.com |
| Incoming (IMAP) Server Ports- 993 | IMAP Password – Your current Gmail account password via you log-in to Gmail. |
Requires SSL Encryption– Yes | Requires Authentication – Yes |
Gmail POP (Post Office Protocol) Settings for iPhone
| Incoming (POP) Mail Server Settings of Gmail | Gmail Account Login Information |
| Incoming (POP) Server Host- pop.gmail.com | POP Username- Your full Gmail account address. Example: username@gmail.com |
| Incoming (POP) Server Ports- 995 | POP Password – Your current Gmail account password via you log-in to Gmail. |
| Requires SSL Encryption– Yes | Requires Authentication – Yes |
| Requires TLS Encryption – Yes (in case if applicable) | —— |
Gmail SMTP (Simple Mail Transport Protocol) Settings for iPhone
| Outgoing (SMTP) Mail Server Settings of Gmail | Gmail Account Login Information |
| Outgoing (SMTP) Server Host- smtp.gmail.com | SMTP Username- Your full Gmail account address. Example: username@gmail.com |
| Outgoing (SMTP) Server Ports- 465 to use with SSL and 587 to use with TLS | SMTP Password – Your current Gmail account password via you log-in to Gmail. |
| Requires SSL Encryption– Yes | Requires Authentication – Yes |
| Requires TLS Encryption – Yes (in case if applicable) | ——- |
Carrying on, it’s vital to point out that, while you have to use SMTP protocol for Gmail’s Outgoing Mail Server, you can use either IMAP or POP protocol for the Incoming Mail Server for Gmail on iPhone to successfully add your Gmail account on iPhone.
Thus, considering that you can configure Gmail on iPhone using either one of the Incoming Mail Server; we’ve mentioned the instructions of both methods, namely IMAP and POP. So, have all your attention here to learn how you can configure Gmail on iPhone using IMAP as well as how you can configure Gmail on iPhone using POP.
Method 1: Set up Gmail on iPhone Using IMAP Protocol Settings
[Perquisite: To add Gmail in iPhone Mail using IMAP settings, you first need to enable the IMAP Protocol of your Gmail account, in case if disabled. Otherwise, you won’t be able to access your Gmail account via iPhone Mail.]
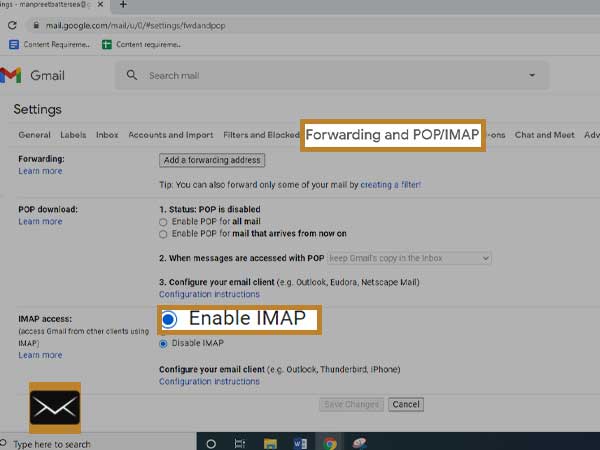
| Q: How to Enable IMAP Settings of Gmail?
A: To enable IMAP settings of Gmail, perform these steps—
 |
Now, let’s begin with the step-by-step instructions to configure Gmail on iPhone Mail using IMAP—
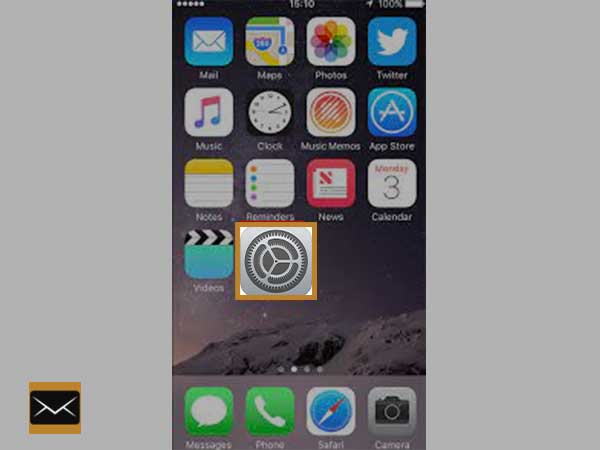
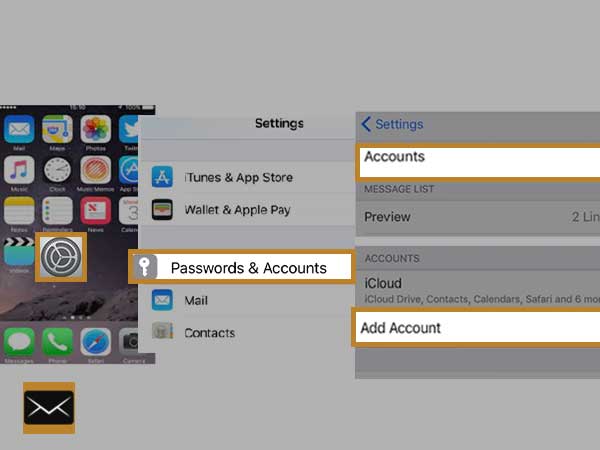
Step 1: On your iPhone’s home screen, tap on the ‘Settings’ icon to open the iOS settings menu.
Step 2: Inside it, scroll down to the ‘Password & Accounts’ option and tap on the same.
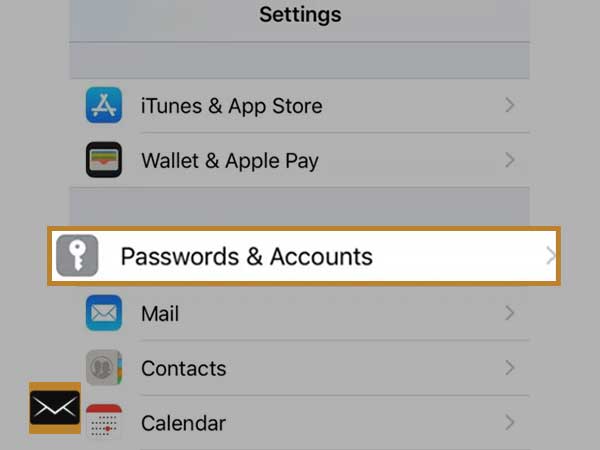
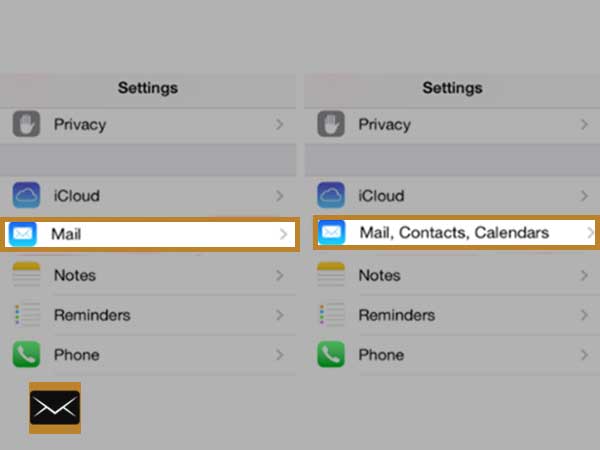
[Note: For the older iOS versions of the Mail app, you may need to select the “Mail” or “Mail, Contacts, Calendars” option.]
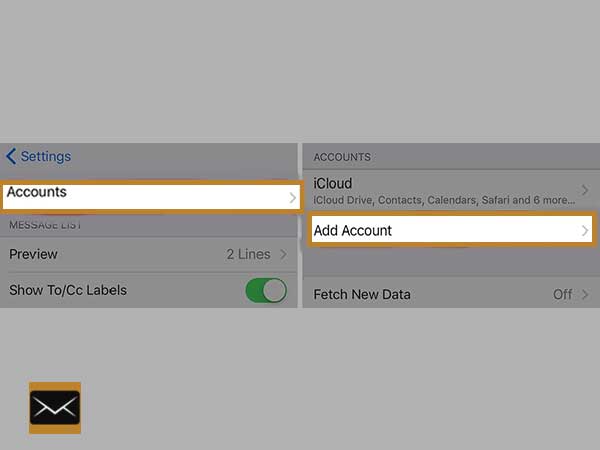
Step 3: Then, tap on the ‘Accounts’ section to further tap on the ‘Add Account’ option which is underneath the iCloud tag.
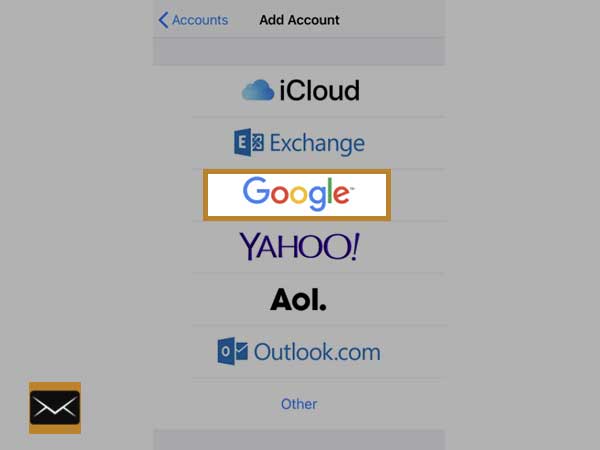
Step 4: By doing so, a list of email clients like Outlook, iCloud, Gmail, Yahoo, and so on will appear on the screen. Out of all, you’ve to simply select the ‘Google’ option.
Step 5: After selecting it, you’ll be directed onto the page where you’ll be asked to provide the login credentials of your Gmail account.
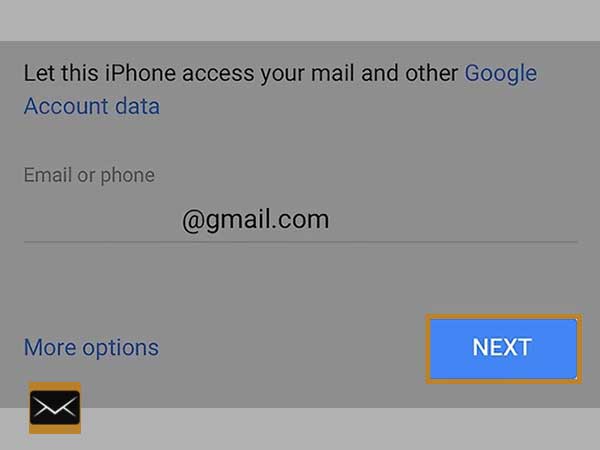
- Firstly, type in the full email address of your respective Gmail account in the labeled field and tap on the ‘Next’ button.
- Secondly, type in the password of your respective Gmail account in the labeled field, and again, tap on the ‘Next’ button.
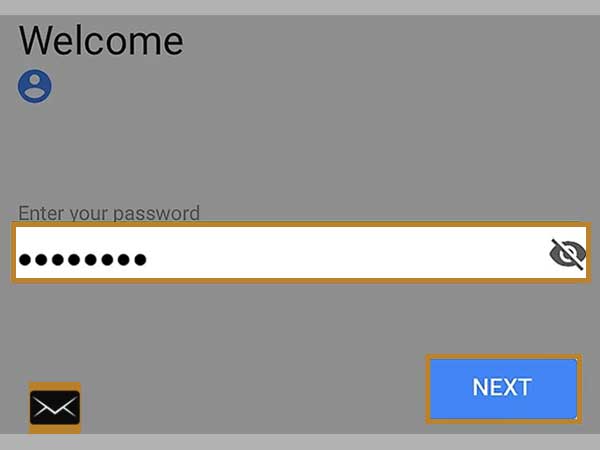
[Note: In case, if two-factor authentication (2FA) is enabled on your Gmail account then, you need to first follow the on-screen available instructions to sign in successfully.]
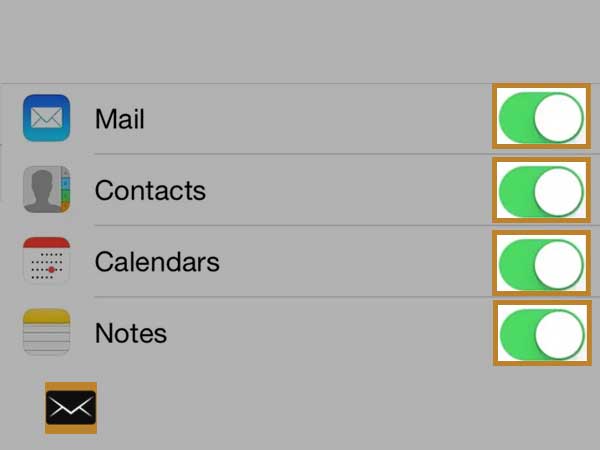
Step 6: Now, the Gmail login credentials that you’ve entered will be verified and after the verification process, you’ll be asked to select a few options like ‘Mail, Contacts, Calendars events, and Notes’ for syncing them with your iPhone. To be precise, you need to use the slider option of each respective option to turn their toggle switches to green.
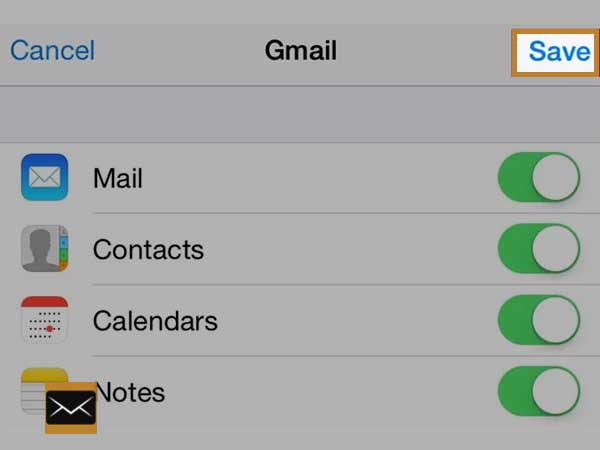
Step 7: Once, you finish doing so, tap on the ‘Save’ button to finally send and receive Gmail messages using your iPhone Mail app.
Method 2: Set up Gmail in iPhone Mail Using POP Protocol Settings
[Perquisite: To add Gmail in iPhone Mail using POP settings, you need to enable POP Protocol of your Gmail account in advance, if it’s disabled because until then, you won’t be able to open Gmail in iPhone.]
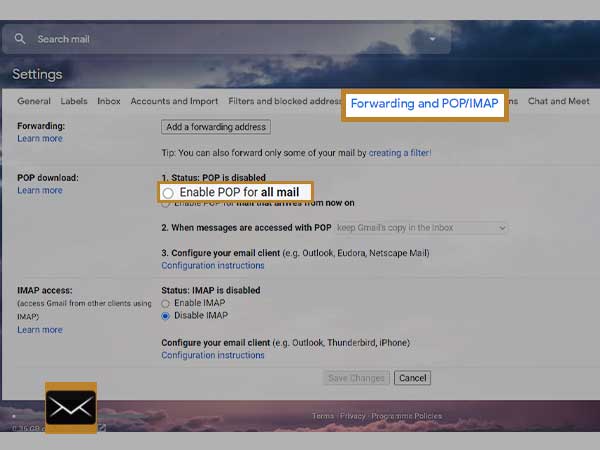
| Q: How to Enable POP Settings of Gmail?
A: Perform these steps to enable POP settings of Gmail—
 |
Now, let’s begin with the step-by-step instructions to configure Gmail on iPhone Mail using POP—
Step 1: Like the first few steps of the above method, you need to open your iPhone’s ‘Settings’ app and tap on the ‘Passwords & Accounts’ option to further select the ‘Accounts’ as well as ‘Add Account’ options respectively.
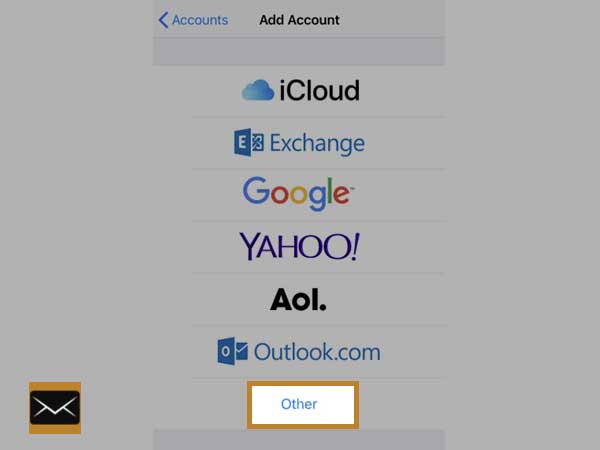
Step 2: Then, what you’ve to do is select the ‘Other’ option instead of selecting ‘Google’ from the list of email providers.
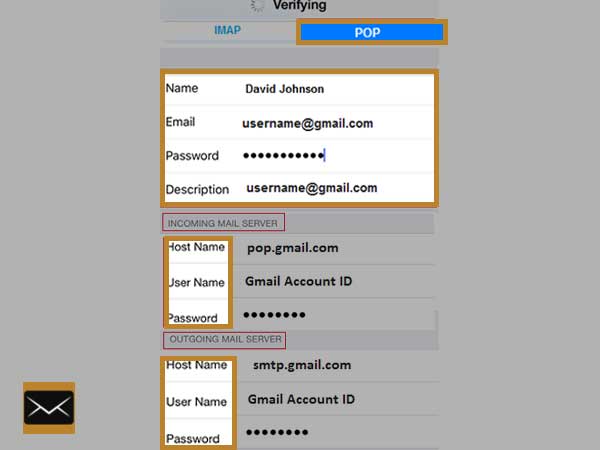
Step 3: After that, tap on the ‘Add Mail Account’ section to enter the respective user-data of your Gmail account in these following columns—
- Name: (Your Full Name).
- Email: (Email Address of your Gmail Account).
- Password: (Password of your Gmail Account).
- Description: (A short description or write Gmail ID).

[Note: In case, you’ve enabled 2FA for your Gmail account, you can use the app password in place of the account password.]
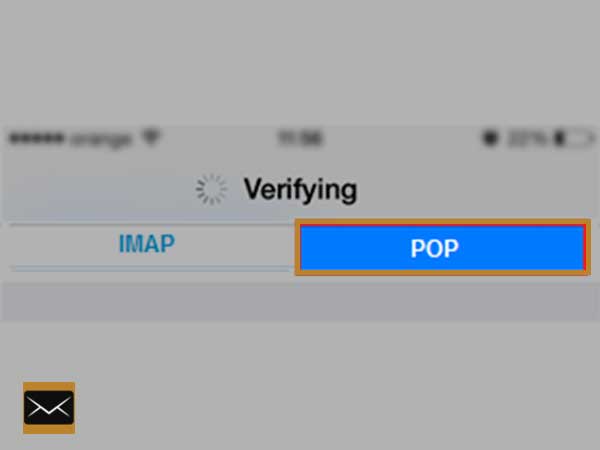
Step 4: Once you finish inputting the details of your Gmail account, tap on the ‘Next’ button and simply select ‘POP’ as the account-type option for your email account.
Step 5: Now, enter the following Gmail POP settings in the ‘Incoming Mail Server’ section—
- Host Name: pop.gmail.com
- User Name: Full email address of your Gmail account
- Password: The password to your Gmail account
Step 6: Similarly, in the ‘Outgoing Mail Server’ section, enter the following Gmail SMTP settings—
- Host Name: smtp.gmail.com
- User Name: Full email address of your Gmail account
- Password: The password to your Gmail account
Step 7: Once you finish entering these details, just tap on the ‘Save’ option to save your Gmail account on your iPhone Mail app.
Step 8: Further, tap on the ‘Mail’ toggle switch to turn it green and along with that, you’ve to sync your Gmail contacts, calendar events, and notes by also turning their toggle switch to green.
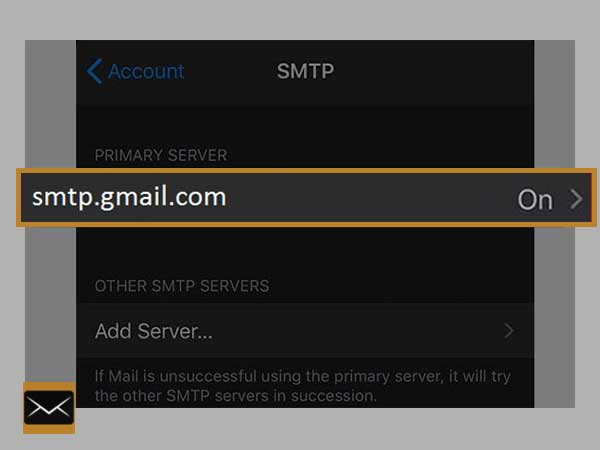
Step 9: Now, select your Gmail account that you’ve recently added from the available list of accounts.
Step 10: Next, you’ve to tap on ‘smtp.gmail.com’ which is there at the bottom of the page and again on the same from the top of the next page.
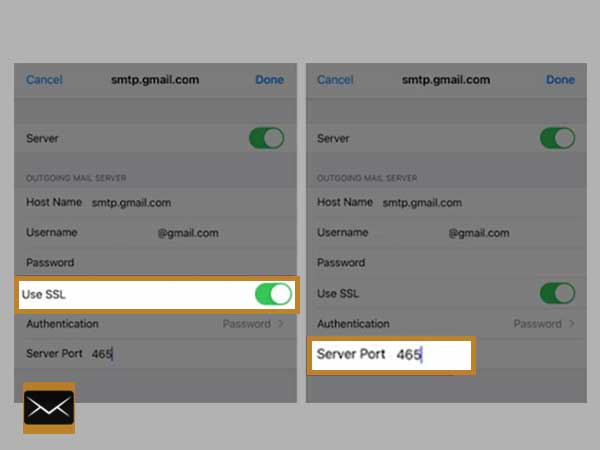
Step 11: In continuation, turn the ‘Use SSL’ toggle switch on, and instead of the existing number, enter [465] in the ‘Server Port’ text-box.
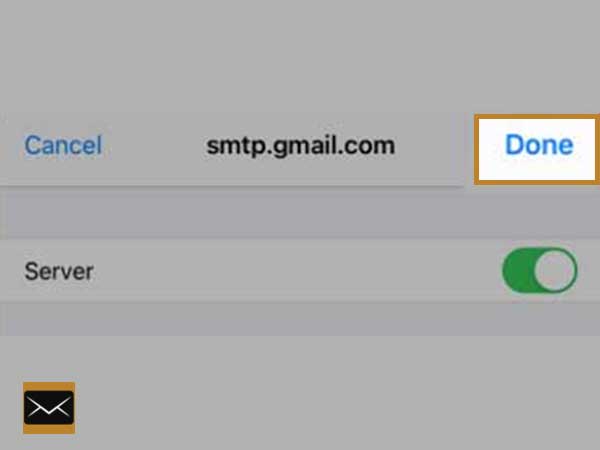
Step 12: And, in the end, just tap the ‘Done’ button to finish the setup process.
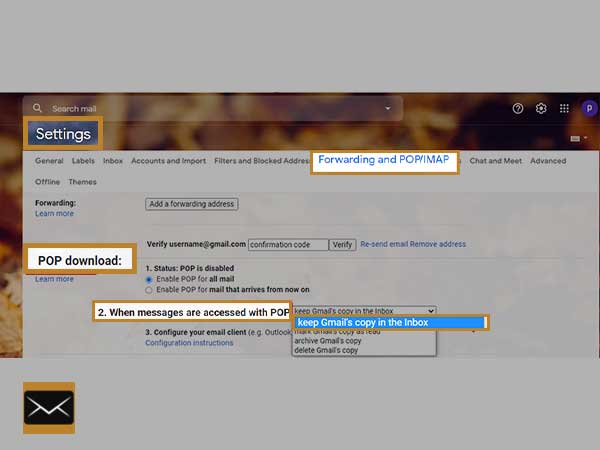
[Important: Based on POP download settings of your Gmail account, you’re likely to delete emails on your iPhone without deleting them from your Gmail account. And, to adjust this setting, you can navigate to ‘Gmail Forwarding IMAP and POP settings.’ There, in the ‘POP Download’ section, select the drop-down menu of “When messages are accessed with POP” to choose the “keep Gmail’s copy in the Inbox” option.]
That’s it! This is all about the step-by-step process of ‘how to set up Gmail on the iPhone.’ Hopefully, you all now have got enough understanding of the process and can connect Gmail with your iPhone Mail app easily.
Read more Configuration of the SBCGlobal account in the iPhone