GoDaddy email is the most celebrated email registrar that is perfect to start a business website at low prices. GoDaddy offers you a complete package that contains business email as well. But over time businesses have reported several issues with GoDaddy email. These issues can range from GoDaddy login issues, GoDaddy email problems with Outlook, email not loading, GoDaddy sending and receiving issues. Every issue is different and hence requires special troubleshooting. Therefore, we have designed a guide that will offer you the most befitting solutions to the most common GoDaddy email problems.
Most Common GoDaddy Problems and Their Solutions
Problem 1: Cannot Log-in to GoDaddy Email Account
Solution: GoDaddy email login issues have become ubiquitous, but there are plenty of approaches that will help you fix GoDaddy email sign-in issues.
Recover your Username
If you believe that the password you are entering is correct, you are suggested to reset your username in case you are facing any issue while accessing your GoDaddy email account. To recover your username, follow these steps:
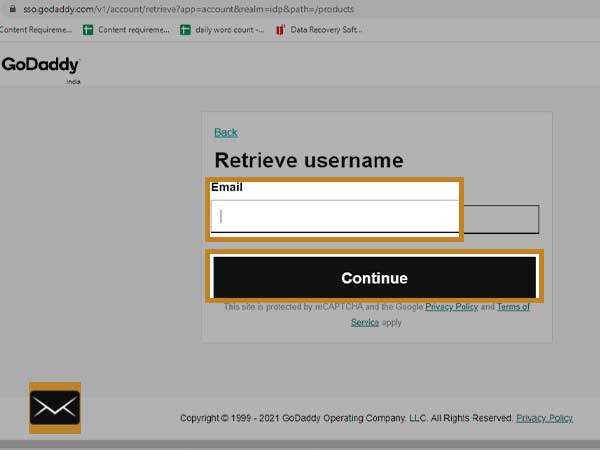
- Open the GoDaddy username recovery page.
- Type in the email address associated with your GoDaddy email account and click Continue.
- Then, enter your GoDaddy domain name in the Domain URL text field. Here you need to type-in the domain that belongs to your email account such as userexample.com and click Filter. You will receive OTP on your provided email address.
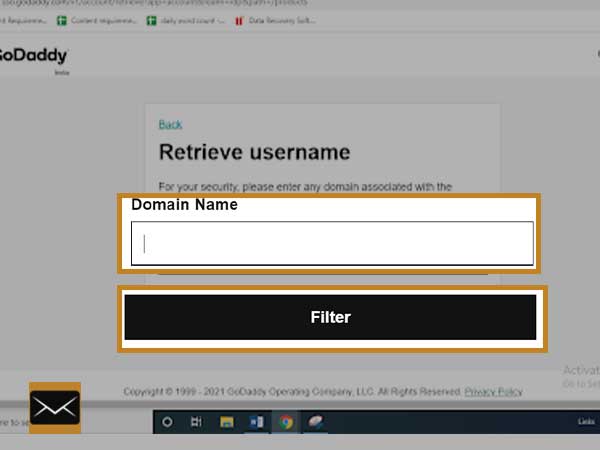
- Enter the Verification Code that you receive on your email address and click Continue. You will receive the username and customer number on your screen.
Reset GoDaddy Email Password
If you have forgotten your GoDaddy email password, your GoDaddy account is locked or compromised, try to reset your account password using these steps.
- Open GoDaddy password reset page.
- Provide your Username or your Customer #.
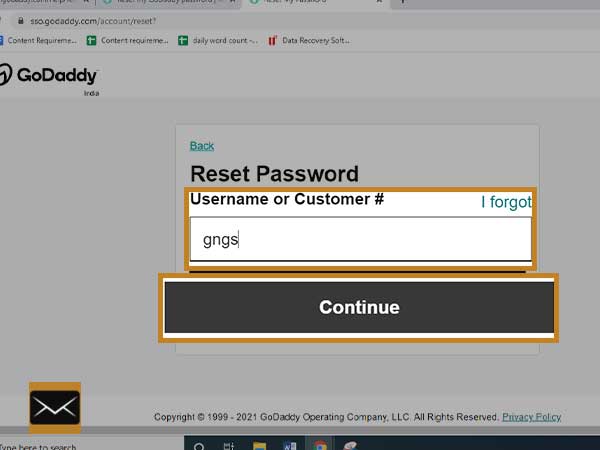
- You need to complete the security challenge and click Submit.
- Then, you will receive an email containing a password reset link on your email address.
Fix Two-Step Verification Issues
If you have enabled two-step verification for your GoDaddy email account, but it is not working for you and you are not receiving codes, you need to check this table containing different problems and their befitting solutions.
| Problem | Solution |
| When not receiving the codes on your smartphone | Check if your carrier is blocked |
| Getting an error message stating, “To protect your account, we locked this verification method for 24 hours due to too many code requests.” | When someone makes repetitive requests for “resending codes”, the 2SV is locked for 12-24 hours. So, wait for 24 hours or cancel the two-step verification to reset if you don’t have access to the device on which you are receiving codes. Follow the instructions under “I don’t have access to that device.” |
| The phone number is based in India and you are not getting the codes. | There can be errors with the message service provider called Twilio. Check if Twilio can’t reach you. |
| The device doesn’t have the set up for 2SV (lost phone, changed phone number, etc.) | You should Cancel two-step verification in such cases, just consider the instructions under “I don’t have access to that device” section |
| If 2SV is not working and you want or need to cancel 2SV, you can’t cancel it without using 2SV to log in. | Check the Cancel two-step verification and go through the instructions under I don’t have access to that device. |
Use Right Website for Signing-in
Most of the time users end up landing on websites other than GoDaddy. So, make sure that you are using the correct and authentic GoDaddy website to sign-in to your GoDaddy email account. Do not use any third-party email account to sign in to your GoDaddy account as it can increase the risk of the account being compromised.
Problem 2: Email Sending and Receiving Issues
When you can’t send or receive emails on your GoDaddy email account, it can halt the entire workflow and thus you can’t focus on other important things. So, addressing this issue is necessary to retrain the normal operating capacity of GoDaddy email.
Many users may not know that GoDaddy uses an integrated mail system to manage the flow of emails. It is called secureserver.net. This system has its share of advantages and disadvantages, but this server has always been a center of attraction for hackers and cyberpunks. This is why the server often faces outages and downtime as their spammers choke it with junk and spam. But, we all know that the pricing of GoDaddy is substantially nominal and therefore it is an ideal platform for entry-level businesses. GoDaddy is the first name that strikes our mind when we need to start a website at affordable prices. But, as the business and traffic grows, clients start facing outages with the setup of their business email.
1. Adjust Security Software Settings
So, in the cases when you can’t send or receive messages, you first need to be sure that firewall software settings are not interfering with the GoDaddy email client and preventing Workspace from performing efficiently. Look out for the firewall, browser security settings, ad-blocker, and pop-up blocker settings and you can temporarily disable them if required.
2. Add GoDaddy to Approved Sites
If you believe that you are not able to use GoDaddy email because your browser may find it illegitimate, you are suggested to add GoDaddy to the Trusted Sites on your browser. The process may differ for different browsers; check it for Chrome, Firefox, and Internet Explorer
On Internet Explorer 7, 8 & 9:
- Open Tools > Internet Options > Security.
- Now, hit on the “Trusted Sites” icon, then select “Sites”.
- Enter the URL http://email.godaddy.com and click Add.
- Tap Close.
On Google Chrome:
- Tap on the 3 horizontal lines icon from the top-right corner of the Address bar.
- Open Settings and scroll down to find the “Show Advanced Settings” link.
- Select “Change proxy settings”.
- Tap on “Security tab >> Trusted Sites icon>>Sites”.
- Enter the URL http://email.godaddy.com and then select Add.
- Click Close and then OK.
On Firefox:
- From the homepage Firefox menu, open Tools >> Options
- Under Content, select “add Exceptions”.
- Now, provide the URL http://email.godaddy.com, to keep it as a trusted site.
- Select Close and then OK
3. Set WorkSpace Email to SSL Mode
In the continuation to the previous steps, set your Workspace Email account to SSL mode, after you are done adding GoDaddy to the approved website. Follow these steps:
- In the GoDaddy webmail Classic View, open Settings.
- Open Personal Settings.
- In the Security Options, choose Use Full-Time SSL Mode, Click OK.
4. Clear Browser Cache
After you are done with the aforementioned steps, sign out of the GoDaddy webmail account. Then, clear cache, cookies, and history from your browser. Also, make sure that you clear the stored passwords and auto-fill data.
Click on the name of the browser you are using to check how you can clear stored data.
Problem 3: Emails Are Marked As Spam
Are your all Outgoing emails marked as spam? This could be embarrassing as well as perturbing and fixing it may also need a hard effort if you don’t get the right guidance. To explain this in layman’s language, “Your GoDaddy messages are marked as spam because you are not being recognized as a valid sender due to the past reputation of your email server. Your email address is suspected of sending spam and thus every email is marked as spam when it lands into the recipient’s inbox.”
Why Is this Happening?
As spam and viruses have been escalating with a rapid speed, ISP decided to put an end to email accounts sending spam with the help of formats of incoming emails. The application of new business class setups, and email authentications namely “DKIM” & “SPF” ensures the legitimacy of your email server. These servers are designed to act as a fingerprint on the email envelope and find whether it’s real or spam.
The ISPs made it mandatory to employ the DKIM & SPF records on all email servers due to which some older GoDaddy email clients were recognized as spam and they were not properly set up.
In such cases, you need to contact your Internet Service Provider (ISP) to apply these authentications. Or, you can add an SPF record to your GoDaddy domain manually.
How to Add SPF to a GoDaddy Email?
Sender Policy Framework or SPF is a TXT record that is found in your DNS zone file. With the SPF setup, ISP figures out whether the email server is allowed to send emails or it should be marked as spam. SPF record is highly beneficial to find and control spam on outgoing emails. Here are the steps, how you can setup SPF on your GoDaddy email account.
- Sign-in to your GoDaddy Domain Control Center.
- Choose the domain to open the Domain Settings page.
- In the Additional Settings section, select Manage DNS.
- Click on Add in the records table.
- In the “Type” menu, select TXT.
- Provide the required details for your SPF record:
- Host: The domain or subdomain associated with your SPF record. To add the record on root domain, type “@” in the Host section.
- TXT Value: It is the SPF rule to be used. For instance, enter v=spf1 mx -all in all the indicate emails that you allow from your mail server and not on others. You can know more about SPF record syntax.
- TTL: the time limit for which the server would cache information. The default setting is set as 1 hour.
- Click Save to imply your new SPF record.
Important Note:
- You should choose up to 48 hours to make changes effectively globally.
- Make sure you add less than 512 characters with only UTF-8 characters.
- You can make edits to SPF later.
- You can create a template to assign DNS records instantly
Problem 4: Inbox Is Full of Junk Email
Solution: Junk pop-up whenever you open your GoDaddy email inbox? This can make you miss important emails when junk occupies space in your inbox and prevent important emails from landing in your inbox. It is possible that spammers have spotted and selected your account to carry out their ill motives.
Three major ways how spammers can hit you:
1. Your GoDaddy email is posted on some other web page in cleartext. To find this, you should try to search your email address in Google and other search engines such as Bing and Yahoo. If your email appears in search, you might be in serious trouble.
2. The GoDaddy website contact form may be on the target of spammers and want to get into your contact form to steal the data in the “From” section. If your contact form is old and less secure, the forms contain and save email used in the “from” line.
3. If your email was used to sign-up for a less-authentic website, and the same site has sold your email to spammers, you are likely to receive a whole lot of junk emails. Therefore, it is recommended that when you need to sign-up for marketing material or make purchases, try to use your Gmail or Hotmail account instead of using your professional or business GoDaddy email account.
To control junk on GoDaddy email inbox, you should try the below-given tips.
As we know, GoDaddy offers websites at cheap prices hence expecting high-end spam protection would be an injustice. But, excessive spam can be quite threatening for business and hence should be controlled from the very beginning. GoDaddy may not take the responsibility for what’s happening with your email account if you don’t follow the prescribed security measures. So, the below-given tips are quite useful to save your company from the risk of spammers.
Setting up Spam Filters
- Sign-in to the Workspace Webmail.
2. Go to the Settings menu, and select Spam Settings.
3. In the Spam filtering section, select any of the following:
- Turn off filtering — if you want No action to be taken on suspected spam. It will be delivered to your Inbox.
- Move to Bulk Mail — (highly recommended) All the Suspected spam emails will be moved to the Bulk Mail folder. You can review it later whenever you need.
- Mark subject with [SPAM] — Suspected spam emails will be directed to your Inbox with [SPAM] with the related subject line.
- Restricted mode — all mail will be moved to the Bulk Mail folder, unless the sender belongs to the “Allowed List”.
4. Next, in the “When I mark messages as spam” section, select any of the following options:
- Ask me what to do — whenever you mark an email as spam, Workspace Webmail will ask you if all the messages from that particular sender should be saved in the Bulk Mail folder, or just a few selected messages.
- Mark all messages from that sender in that folder — all the messages you selected from that sender will be marked as spam and moved to the Bulk Mail folder.
- Mark only selected messages — only the selected emails will move to the Bulk Mail folder.
5. Click OK to apply spam filters.
Mark Emails as Spam
By marking an email as spam, GoDaddy Webmail will apply the action when you will set spam filters in the future.
To Mark Email as Spam
- Sign-in to your Workspace Webmail.
- Select the email you think is spam.
- Click on More Actions menu and choose “This is Spam”.
- Click Apply.
Setting up Auto-purge Email address
If you want bulk purging for a certain email address or domain name, this feature will help you keep spam emails at bay from particular email addresses.
To Set Up Auto Purge
- First, sign-in to Workspace Webmail.
- In the Bulk Mail folder, select the email you want to purge.
- Select the Auto Purge option.
- Select whether to purge all emails by sender or by domain, and then tap on OK.
Cautious: The emails from auto-purged senders can’t be recovered.
Setup Blocked Users
By blocking email addresses or domains that are sending spam, you can control the amount of spam in your Workspace webmail inbox.
To Set Up Blocked Senders
- Sign in to Workspace Webmail.
- Open the Settings menu, and select Message Filters.
- Open Blocked List option.
- Click on “Add new” and then OK.
The emails or domains that are saved in the “Blocked List” menu would be considered as spam and those emails will be treated as spam and will be filtered according to spam settings.
Conclusion
This elaborated guide has everything that one needs to deal with the GoDaddy webmail issues. So, whenever you feel stuck while using Workspace webmail, this guide will come to the rescue and help you retrieve your GoDaddy email account to its original state.